Monday, October 15, 2012

Cloning of a SIM Card


Step 1First you'll need the IMSI (International Mobile Subscriber Identifier) number. This string of numbers is usually
imprinted on the SIM card itself.
This is an example of an IMSI number:IMSI:429011234567890
An IMSI is usually 15 digits long, but can be one or two digits shorter.

Step 2
Now you have your IMSI number you'll need the authentication key (Ki), which is unique to your SIM. This number
can only be discovered electronically using a SIM duplicator, which is an external device that you will slot the SIM
card into.A SIM duplicator is relatively inexpensive - they can be found at around the $10 mark - and can be purchased
at multiple locations. A Google search for 'Super SIM' will turn up at least several online outlets.

Step 3
When the SIM duplicator is connected to your PC and your SIM card, it will attempt to acquire the Ki number and
copy the entire contents. When a new SIM card is placed into the duplicator after this process is complete, that data
will be copied and, for all intents and purposes, the new SIM will be identical to the old.
Things You'll Need:
SIM card
SIM card duplicator.

Chat with your friends using Command Prompt

  1. You only need to know your friends IP Address.
  2. Open Notepad and write this code as it is.....!
@echo off
:A
Cls
echo MESSENGER
set /p n=User:
set /p m=Message:
net send %n% %m%
Pause
Goto A
 
     3.   Now save this as "Messenger.Bat".
     4.   Open Command Prompt.
     5.   Drag this file (.bat file) over to Command Prompt and press Enter.
     6.   You would then see something like this:

     7.   Now, type the IP Address of the computer you want to contact and press enter
          
         You will see something like this:

     8.   Now all you need to do is type your message and press Enter.
           Start Chatting.......!

 
           ENJOY!!!!!

Tuesday, October 9, 2012

Use Hidden Wallpapers and Themes on Windows 7

When you first install Windows 7, it asks for your language, time and currency. Based on your responses, it installs a set of wallpapers and themes. If you choose English (United States) for your time and currency format, for example, the available desktop backgrounds and themes will include a United States section with scenery from locations such as Maine, the Southwest and so on.
Hidden, though, are background scenery and themes from other English-speaking countries -- Australia, Canada, Great Britain and South Africa. Normally, you can't access those backgrounds or themes, but there is a simple way you can install and use them:

1. In the search box in the Start menu, type C:\Windows\Globalization\MCT and press Enter. (Note: If Windows 7 is installed in a drive other than C:, use that letter instead.)

2. Windows Explorer will launch and show you a list of subfolders under C:\Windows\Globalization\MCT: MCT-AU, MCT-CA, MCT-GB, MCT-US, and MCT-ZA. Each subfolder has wallpapers for a specific country: AU for Australia, CA for Canada, GB for Great Britain, US for the United States, and ZA for South Africa.

For any of the countries whose wallpaper and themes you want to use, go into its Theme folder, for example, C:\Windows\Globalization\MCT\MCT-ZA\Theme. Double-click the theme you see there (for example ZA).

3. That will install a shortcut to the theme and wallpapers in the Personalization section of Control Panel.
You can now use them as you would any other theme or background, by right-clicking the desktop, choosing Personalize, and choosing a background or theme. They will be listed in their own section.

Get Battery Performance Report in Windows 7

Have a laptop and want to get more battery life out of it? Windows 7 includes a hidden built-in tool that will examine your laptop's energy use and make recommendations on how to improve it. To use it:

1. Run a command prompt as an administrator. To do this, type cmd in the search box, and when the cmd icon appears, right-click it and choose "Run as administrator."

2. At the command line, type in the following:
powercfg -energy -output \Folder\Energy_Report.html
where \Folder represents the folder where you want the report to be placed.

3. For about a minute, Windows 7 will examine the behavior of your laptop. It will then analyze it and create a report in HTML format in the folder you specified. Double-click the file, and you'll get a report -- follow its recommendations for ways to improve power performance.

Search the Internet from the Start Menu

The Start Menu's search box is a convenient way to search through your PC -- but you can also have it do double-duty and perform Internet searches as well. To enable this feature:

1. In the Start Menu search box, type GPEDIT.MSC and press Enter to run the Group Policy Editor.

2. Go to User Configuration --> Administrative Templates --> Start Menu and Taskbar.

3. Double-click "Add Search Internet link to Start Menu," and from the screen that appears, select Enabled. Then click OK and close the Group Policy Editor.


4. From now on, when you type a search term in the Search box on the Start Menu, a "Search the Internet" link will appear. Click the link to launch the search in your default browser with your default search engine.

Lock your PC using Pen drive


Have you ever seen a movie in which a person in some secret government installation simply inserts and removes a card to log in and log out of a PC? If you thought that idea was cool, you’ll definitely want to investigate Predator. Once installed and configured, this little freeware utility will allow you to turn a USB flash drive into a key you can use to lock and unlock your computer.

With Predator, you can use a USB flash drive as a key to lock and unlock your computer.
 
While the USB flash drive is connected to your computer, everything works as it normally would. Once you remove the USB flash drive, your computer is locked down — the keyboard and mouse are disabled and the screen darkens. To unlock your computer, you just plug in the USB flash drive and the computer will be unlocked and you can begin using it.

To learn more about Predator, and/or to download it, visit developer’s Web site.

Cool Windows 7 Keyboard Tricks !!

Apart from making you work more efficiently and faster, you can also impress your friends or colleagues by being able to work without a mouse. This article describes some cool Windows 7 keyboard tricks to get you started. In the end you might never want to take your hands off the keyboard again.
For your convenience, more keyboard shortcut resources are attached at the bottom.
Note that some of these shortcuts will only work if Windows Aero is enabled. If Aero effects are disabled on your computer, it might not be powerful enough to support resource intensive graphical features. The visual effects may also have been disabled to increase overall performance. If you wish to enable Aero nevertheless

Aero Shortcuts

  • [Windows] + [Spacebar] (Aero Peek)
    Make all open windows transparent to view gadgets and icons on desktop.
cool keyboard tricks


       [Windows] + [D] (Aero Peek)
       Show or hide the desktop.

      [Windows] + [Home] (Aero Shake)
      Minimize all but selected window. Reverse by clicking the key combination again.

      [Windows] + left arrow OR [Windows] + right arrow (Aero Snap)
      Dock selected window to the left or right half of your screen.

      [Windows] + up arrow OR [Windows] + down arrow (Aero Snap)
      Maximized and restores the selected window.

     [Windows] + [SHIFT] + up arrow OR [Windows] + [SHIFT] + down arrow (Aero Snap)
     Maximizes and restores selected window in vertical dimension only.

     [Windows] + [Tab] (Aero Flip)
     Launch 3D representation of open windows and click [Tab] key again to flip through them


Windows & Taskbar
  • [Alt] + [Ctrl] + [Tag] + left/right/up/down arrow
    Flip window.
  • [Alt] + [Tab]
    Cycle through open windows.
windows 7 keyboard tricks
  • [Windows] + [T] OR [Windows] + [SHIFT] + [T]
    Move focus to front or back of taskbar. Press [T] again while holding the [Windows] key to cycle through items in the taskbar from left to right or, with [SHIFT] button held too, from right to left.
  • [Windows] + [B]
    Puts focus on the ‘show hidden icons’ button on the system tray.
  • [Windows] + [1] THROUGH [Windows] + [9]
    Launch first through ninth icon on taskbar, including items pinned to taskbar.
  • [Windows] + [SHIFT] + [1] THROUGH [Windows] + [SHIFT] + [9]
    Starts new instance of respective taskbar icon.
  • [Windows] + [Ctrl] + [1] THROUGH [Windows] + [Ctrl] + [9]
    Cycles through multiple instances of the respective icon.
  • [Windows] + [Alt] + [1] THROUGH [Windows] + [Alt] + [9]
    Opens jump list for respective icon.
fun keyboard tricks

Multiple Monitors

  • [Windows] + [SHIFT] + right arrow OR [Windows] + [SHIFT] + left arrow
    Move selected window from one monitor to another. They will remain in the same relative location.
  • [Windows] + [P]
    Select presentation display mode.
fun keyboard tricks

Magnifier

  • [Windows] + [+] OR [Windows] + [-]
    Activates Windows Magnifier to zoom in or out of screen.
  • [Ctrl] + [Alt] + [D]
    Switch to docked mode.
  • [Ctrl] + [Alt] + [L]
    Switch to lense mode.
fun keyboard tricks windows
  • [Ctrl] + [Alt] + [F]
    Switch from docked or lens mode back to full screen mode.
  • [Ctrl] + [Alt] + [I]
    Invert colors.
  • [Windows] + [Esc]
    Exist magnifier views.

Other

  • [Windows] + [G]
    Cycle through desktop gadgets.
  • [Windows] + [X]
    Launches Windows Mobility Center. Especially useful if you’re working on a laptop.
windows keyboard tricks

Use keyboard as Mouse

How to use Keyboard To Control the Mouse Pointer?

If you have no mouse or not working properly you can use keyboard as mouse in windows 7 and xp both.By using a feature that is built in by windows, called MouseKeys you can use keyboard as mouse. To turn on MouseKeys, go on Control Panel, click on Accesibility Options, click on the tab that says Mouse, and check the ‘Use MouseKeys‘ box. Alternatively, you could turn on MouseKeys by pressing Left ALT + Left Shift + Num Lock at the same time. Please note that this only works with the LEFT alt and shift, as if you try it with the right side, it will not work.
Here are the controls, provided that you have a numeric keypad, to run MouseKeys.


  • 2 = Move Down

  • 8 = Move Up

  • 4 = Move Left

  • 6 = Move Right

  • 7 = Move Diagonally Top Left

  • 9 = Move Diagonally Top Right

  • 1 = Move Diagonally Bottom Left

  • 3 = Move Diagonally Bottom Right

  • 5 = Simulate Mouse Single Left Click

  • (+) = Simulate Mouse Double Click

  • (-) = Simulate Mouse Right Click
  • (*) = Simulate Both Mouse Buttons Click At Once

    If you’ve tried this, you may have noticed that the speed of the cursors is really slow. To speed this up, you just go into Settings, and change the speed.

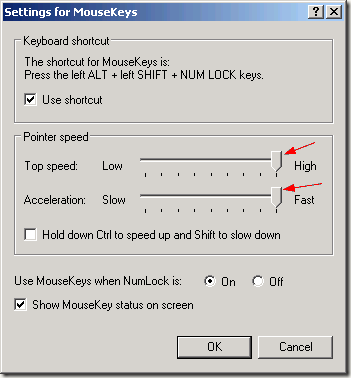
                            Settings For MouseKeys

  • Just drag the sliders along to the maximum speed and acceleration, and it should be absolutely fine.

    Windows 7 Tips and Tricks

    1.PC Safeguard

    I rarely let anyone use my PC because I’m afraid he will mess it up, but it seems Microsoft has been thinking at me and came with a solution. The PC Safeguard doesn ’t let anyone mess your PC
    settings, because after the user logs off, the configurations are reset
    back to normal. Of course it will not restore the configurations changed by you, but only the ones
    done by other users you define.
    To use PC Safeguard, go to Control Panel -> User Accounts and create a new account, then select “Set Up Pc Safeguard ” and switch it on. Then you can stay relaxed when others use your computer, because
    you won ’t find anything changed, including configurations,downloaded software,installed programs.

    2. Screen Calibration Fortunately

    Windows 7 comes with a display calibration wizard that lets you set up the screen brightness properly, so
    you won ’t have any problems viewing photos or text. The problem was that on one PC a photo
    could look sharp and bright and on another it looks awful. Now the problem can be fixed by
    pressing the Windows logo key and then typing “DCCW”.

    3. AppLocker

    If you are usually sharing your computer with someone else, then you might want to restrict their access to your applications, files or documents. Using the Windows 7 AppLocker tool, you have a few options to do this by blocking other users to access Executables, Windows Installers, Scripts, a specific publisher or path. You can simply do this by pressing the Windows key then typing Gpedit.msc. Then go to ComputerConfiguration -> Windows
    Settings -> Security Settings -> Application Control
    Policies -> AppLocker.
    Right click on one of the options (Executables,Installers, or Script) and
    create a new rule. That should save you from a lot of headaches.

    4. Burn Images

    We all had trouble with image burning in Windows, because it couldn ’t do it itself, a standalone software being needed. With Windows 7 this will not be a problem anymore. All you have to do is double-click the ISO image and burn it on the CD or DVD that ’s inserted in the drive.

    5. Display Empty

    Removable Drives Windows 7 will not showempty drives by default, so if you connect an empty
    drive to your PC, don ’t worry, just go to Tools ->Folder Options -> View and uncheck “Hide empty drives in the computer folder ”. This doesn ’t seem like a good idea and it should not be default
    setting, because it will be hard for inexperienced users to figure it out. I bet a lot of users will return their newly bought drive thinking it ’s broken.

    6. Dock The Current

    Windows To The Left Side Of The Screen This new feature seems useful because sometimes it’s disturbing that windows seems to float like crazy on the screen and it’s hard to attach them to one side of it. Now this
    can easily be done using a keyboard shortcut. Press the Windows key + Left key (arrow) to dock it to
    the left side of the screen. 6.1 Dock The Current Windows To The Right Side Of The Screen Press the Windows key + Right key to dock it to the right side of the screen.

    7. Display Or Hide

    The Explorer Preview Panel Press ALT + P to hide it then once again to display it.

    8. Display Gadgets On Top

    Of Other Windows Press ALT + G

    9. Background Photo Slideshow

    If you are like me, lazy and bored, then you will want to change the background from time to time, wasting
    a lot of time. Now you don’t have to do this anymore, because you can set up a slideshow. Right click on the desktop then go to Personalize ->Desktop Background and hold the CTRL key while choosing the images. Then you can choose the time intervals between imagesand opt to display them randomly or in a row.

    10. Make The Taskbar Smaller

    If you feel like the taskbar is using too much of your screen space, you can choose to make the icons smaller. To do this, right-click on the Start button, then go to Properties ->Taskbar and set it to “Use small icons”

    How to delete access denied Files

    Have you ever encounter problems while deleting some files or folders that left out by some applications or viruses. When you try to delete the directory or file, it'll say "Cannot delete file; Access is denied". In these situations some software's like Unlocker will help you out. It can be used either in xp, vista or windows7.


    Unlocker is a free tool that adds an option to explorer context menu to perform a no. of operations like delete, rename, move etc. This software removes the locking protection from files and you'll be able to delete it. Follow these simple steps to delete access denied file or folder in windows.


    • Download and install Unlocker from here.
    • Right click on the file or folder you want to delete then select unlocker from the menu. A window will pop out and ask you to select an operation.


    • Select delete and click OK. In a few moments, your file should be deleted.

    Fix missing dvd drive in windows 7

    Sometimes you may experience missing dvd drive in your windows 7 even if it is listed in the BIOS. The solution belongs to some registry tweaks. To bring dvd drive back to windows explorer, do the following:
    • Click start button, type REGEDIT in the search box and press enter. This will open up registry editor for windows 7
    • Browse for HKEY_LOCAL_MACHINES\SYSTEM\Current Control Set\Control\Class . Onces you reached here, look for Upper Filters and Lower Filters keys and delete them if it's there. 
    • Restarting you PC will solve your problem.
    • Still there is no dvd drive showing after restarting your computer, then try the following:
    • Right click and select Manage
    • Select Disk management in the computer management window
    • right click on your dvd drive and click change drive letter and path.
    • In the new window, click Change. Select a drive letter where it shows assign a drive letter, in the new window. Click OK


    • Restart your computer.

    Preview files while Downloading with IDM

    IDM - Internet download Manager software is one of the best download managers that  uses dynamic file segmentation and safe multipart downloading technology to accelerate file downloading. Often if we download large files like movies, we want to check that the file which is downloading is correct. But IDM users have no option to preview movies or songs while downloading except rar preview. But this can be achieved by a simple trick. You only have to follow these steps.


    Things to Note: IDM multipart technology uses file splitting before downloading to boost downloading speed. This is why the file preview is not available in IDM. If you send a request to download a file using IDM, it splits file into pieces, then download each part in a sequence. However this tech may slow down download some times in my experience. For full preview of the downloading file, you have to disable this file splitting. 


    To do this, goto IDM options by clicking Downloads > Options. Click on Connection tab. Enter Default Max. Connection Number as 1. then click Ok. Then download you file.Your further downloads may look like this:

    Steps to Preview Files While Downloading with IDM

    1. Open IDM the click Downloads > Options, Save to tab.
     
     
    2. Look for the temporary  path where IDM stores the uncompleted download parts.
    3. Go to the location in your computer and find your file name that you were currently downloading. ( This can be done by goto DwnlData in temp folder the arrange files by modified by right click. )
    4.  You will have a file and a log file in it. You are almost done. 
    5. To preview the file open the file using VLC media player (If you are downloading a movie)

    You can play the file as much as the download progresses.

    How to Increase the Processor Power of your Computer

    Today tip is very useful for those users who are still using computer with minimum processor speed. To increase the performance of slow computer, you can force your system to free up the idle tasks that are running in the background and sharing processor power. This end tasks method force the computer to devote its full processor resource to what you want it to do.

    Follow the given steps to end the idle tasks:

    1. To enable this feature, you will need to be logged into your computer with administrative rights.

    2. Click Start button and click on Run option.

    3. In the Run box, type the command Rundll32.exe advapi32.dll,ProcessIdleTasks  command

    4. And press Ok button.


    Here system will take some time to end the background idle tasks.

    How to fix audio and video mismatch while watching movies

    Many of us are busy in downloading movies and videos from web in different formats such as avi, mp4, flv, mkv etc.. But these converted formats has a problem. The audio video sync may not be correct in all videos. In many videos, sound track may be lead over video track.But this problem is identified by media player coders, and they attached an option to fix the desynchronization of video. All you have to do is play your media file in VLC media player or Media Player Classic (MPC) and identify shift direction. Then you will be able to adjust the audio shift.

    How to Fix Audio Sync Using VLC Media Player

    Here's the steps to fix :
    1. Play your file in VLC and identify the shift of sound track.
    2. Click Tools > Preferences, Select 'Show Settings' from Simple to All.
    3. Click Audio on the left, locate audio desychronization compensation field. 
    4. Enter the shift value in milliseconds. If you feel one second shift, the input 1000 or -1000 according to shift direction.
    5. Click OK and Play the File. 
    6. You can use Keyboard shortcuts J and K to adjust audio sync.
       How to Fix Audio Sync Using Media Player Classic (MPC)

      You can do the same with media player classic.
      1. Open movie file in MPC. 
      2. Click View > Options, select Audio Switcher from left.
      3. Check Audio time shift (ms) and enter shift value in milliseconds like in VLC.
      4. Play the file

      How to Run turbo C++ in Fullscreen Mode

      When you try to run turbo c++ IDE on latest version of windows like Windows7 or Vista, you may get the error message that 'The system does not support full screen mode. Choose close to terminate the application.'
      The problem is that turbo C is very old DOS program. It's better to move on to an up to date compiler like visual c++ Express which is free and you certainly would have a better experience.

      Anyway if you are up with turbo c++ and used to it, I have 3 tricks to run it full screen on windows7 and vista. The tricks can be simply classified based on which works on all versions of windows7 and one which only works under Windows 7 Enterprise, Windows 7 Professional, and Windows 7 Ultimate.

      Technique 1

      Log on to windows7 in safe mode. In safe mode the application running capabilities of an operating system is low and this mode is used as trouble fixing for OS. But this method is much simpler and you only need to log on to safe mode by pressing F8 on start up.
      By summarizing the steps:
      1. Install turbo C++
      2. Start windows7 in safe mode.
      3. Execute turbo C++
      Technique 2

      By Disabling your graphics adapter.  This trick is done by just uninstalling the graphics driver. To do that
      1. Right click on My Computer, click Properties
      2. Select Device manager->Display Adapters
      3. Identify the display adapter of your computer, and uninstall.
      You should try this trick only if you do not use your computer for Graphic related operations like playing multimedia games.By this trick graphics would look vulgar but you can run C++ in full screen.

      Technique 3

      By using DOSBox software. It is an  open source DOS emulator for BeOS, Linux, Mac OS X, OS/2, and Windows. This tool is primarily intended to play DOS games on windows7 but here we can use it run turbo C++ in Full screen mode.

      1. Download DOSBox frome here. (for windows)
      2. Install and run the DOSBox.
      3. Now a command prompt type window will appear. We need to mount TC folder. 
                    Just type “mount c: c:/tc” and press enter. 
      • Assumed that Turbo C++ is installed in C drive and TC folders located at C:\TC
      • You may get a message that 'Drive C is mounted as local directory C:/TC\'                             
      • Change the directory to C/BIN/tc.exe. To do that, please follow the steps as shown in the below screen shot.
      Now the Turbo C++ will open in DOSBox. Press ALT+ENTER  to toggle between full screen and mini screen.


      By applying the above 3 tricks, you can run C compiler on full screen mode in windows 7.

      IPv6: Are You Ready?

      As IPv6 is around the corner and set to grow in the coming few years, are you ready for it yet?
      Find out using this test if your network are ready for IPv6.

      IPv6
       
      IPv6 is an IP address standard designed to replace the current IPv4 protocol, which has been in use since the 1980s for routing Internet traffic. The new protocol has been available for several years now and supports several magnitudes more address spaces than IPv4, while also providing better security and reliability.
      For more than 30 years, 32-bit addresses have served us well,but the growth of the Internet has mandated a need for more addresses than is possible with IPv4. IPv6 allows for vastly more addresses. IPv6 is the only long-term solution,  it has not yet been widely deployed. With IPv4 addresses expected to run out in 2011, only 0.2% of Internet users have native IPv6 connectivity.

      Decomposition of an IPv6 address into its binary form.
       
      Decomposition of an IPv6 address into its binary form.
       
      While IPv4 allows 32 bits for an Internet Protocol address, and can therefore support 232 (4,294,967,296) addresses, IPv6 uses 128-bit addresses, so the new address space supports 2128 (approximately 340 undecillion or 3.4×1038) addresses. This expansion allows for many more devices and users on the internet as well as extra flexibility in allocating addresses and efficiency for routing traffic. It also eliminates the primary need for network address translation (NAT), which gained widespread deployment as an effort to alleviate IPv4 address exhaustion.
       
      On 8 June, 2011, top websites and Internet service providers around the world, including Google, Facebook, Yahoo!, Akamai and Limelight Networks joined together with more than 1000 other participating websites in World IPv6 Day for a successful global-scale trial of the new Internet Protocol, IPv6. By providing a coordinated 24-hour “test flight”, the event helped demonstrate that major websites around the world are well-positioned for the move to a global IPv6-enabled Internet, enabling its continued exponential growth.
       
      Organised by the Internet Society, the project was intended to raise awareness about the need to start the global transition to IPv6 and to enable participants to gather data about potential glitches.
      Many of the problems are likely to stem from the simple facts that IPv6 is far newer and untested technology compared with IPv4, and that the two protocols will need to coexist for several years.
      The real test of the IPv6 protocol, however, will come when companies start migrating to it in earnest in the next few years.

      How To Write Protect Your USB Flash Drive?

      Viruses spread to different computers through pen drives.The viruses are capable enough to copy itself to whatever flash drive is attached into the infected computer’s USB drive.If you write protect your USB drives deleting/Copying files or Folders on the USB drive is not Possible.Thus virus is also prevented 
      Here is a freeware utility to make your USB flash drive write protected in single click.USB Write Protector is a portable application that prevents viruses getting copied to your flash drive themselves.

      How to Lock your Mouse and Keyboard

      If you have a computer at home and there are small children in your house, then maybe when you turn on the computer your child is playing with pressing a keyboard button or mouse, and sometimes something unwanted happens, like a sudden there was a error or missing files which leads to improper working of the computer.

      Well if you want that does not happen again so I got Tips to lock the functions of your keyboard or mouse.  The trick is to use a software called  Kid-Key-Lock.

      Kid-Key-Lock is ideal to use to prevent children or others from accidentally pressing a button either keyboard or mouse.


      When Kid-Key-Lock is running, an icon indicator will appear in your system tray.  When you click on the tray icon pop-up menu will appear. All program functions, including the setup dialog box accessible from this menu.This program can work on Windows 2000, Windows XP, Windows Vista and Windows 7 beta.

      Kidkeylock features:

      • Very easy to setup and run
      • Easy to access programs
      The function of the mouse that can be key:

      • click the left mouse
      • click the right mouse
      • middle mouse button
      • double click
      • mouse scroll   

      Keyboard lock options:

      • locking standard characters (letters, numbers, special characters, etc.)
      • Buttons such as navigation buttons, keys, function keys, delete, home, etc.
      • Shortcut keys (like alt-tab buttons, window buttons, etc.

      Configure Your iPhone for an Exchange Mailbox

      Steps to Configure Your iPhone For an Exchange Mailbox

      Step 1 : First of all you need to make an account for this. To make the account on your iPhone just go to Desktop -> Click Settings -> Under Settings -> Select Mail, Contacts, Calenders.
      Step 2 : Select Add Account.
      Step 3 : Now Select Microsoft Exchange.
      Step 4 : Now just enter this below information :
      - Email: Enter full email address.
      -Domain: Enter domain name (Optional)
      -Username: Enter the User Name. (Ordinarily follows the format user_domain.com)
      -Password: Enter the password for the mailbox.
      -Description: Enter Exchange Account.
      -Click on Next.
      Step 5 : With clicking Next, You will be questioned to enter the server name, So Enter the Server name as mobile.myexchangeemail.com and Click on Next.
      Step 6 : Now Set the following
      - Mail: ON
      - Contacts: OFF
      - Calendars: OFF
      -Click on Save.
      That’s all. Now you can send and receive mails from your iPhone as you could do with any Blackberry or PDA.

      Latest China Mobiles Secret Codes

      Default user code : 1122, 3344, 1234, 5678
      Engineer mode : *#110*01#
      Factory mode : *#987#
      Enable COM port : *#110*01# -> Device -> Set UART -> PS Config -> UART1/115200
      Restore factory settings : *#987*99#
      LCD contrast : *#369#
      Software version : *#800#
      Software version : *#900#
      Set default language : *#0000# Send
      Set English language : *#0044# Send
      Set English language (new firmware) : *#001# Send

      Nokia hidden codes


       Code                                Action
       
      *#7780#                 To restore the factory settings of mobile set
      *#3283#                 To verify the set Manufacturing date
      *#746025625#       To stop the sim clock
      *#67705646#         Use to delete the operator logo
      *#73#                     Use to reset game scores and phone timers
      *#0000#                 Use to display the mobile software version
      *#06#                     To display the IMEI Number of the mobile
      *#92702689#         To display the mobile warranty related settings
      *#7760#                 To display the Production serial number
      *#bta0#                  Use to display Bluetooth MAC address
      *#9999#                 Use to display the mobile software version
      *#2640#                 To display the mobile security code
      *#43#                     To verify the call waiting status
      *#2820#                 To verify the Bluetooth information
      *#7370#                 To format the mobile phone memory
      *#delset#                To delete the GPRS AND EMAIL settings
      #pw+1234567890+1#       To display the lock status of mobile set
      #pw+1234567890+4#       To display the lock status of your SIM
      *#7328748263373738#     Apply to resets the set default security code

      Open multiple FACEBOOK,GMAIL A/C in one browser!!

      Some time we require to Login to our different accounts of Facebook, Gmail, Yahoo, Orkut etc without Signing Out from first one. If you are in such situation the you can use a Firefox Addon called Multifox which allows Firefox to connect to websites using different user names Simultaneously!. Isn’t that great. For that you require a Firefox Internet browser which you can get freely from Firefox Website.

      For example, if you have multiple Gmail accounts, you can open them all at the same time. Each Firefox window, managed by Multifox, accesses an account without interfering each other. Just follow below step to get Multifox Addon on your Firefox.

      1.Go to http://br.mozdev.org/multifox/
      And click on Install

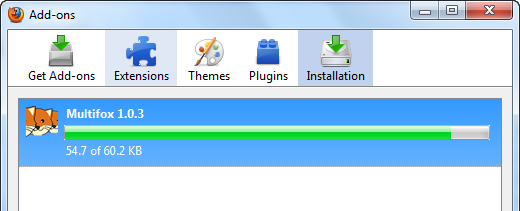
      2.It may give you a pop up to allow it. Just click allow and you will see a install window like below. Click On Install.

      https://blogger.googleusercontent.com/img/b/R29vZ2xl/AVvXsEiqHLyc_rJ9GrLPvbwGFhBkiY5No467AbfpZgushWQzblhSw2WwrSK514xTHkM7wsm0Hdevu0yd5vYmTOimanOksdL-1YDys4pSqirrPD_m86InfCk7wxdUp7WLBev6OjwW3iUv4f1V9mf3/s1600/multifox-+2+account+in+same+browser-install.png

      https://blogger.googleusercontent.com/img/b/R29vZ2xl/AVvXsEj6clf5Cfi92k0DOadnbZGQMzyTJWOzRyYJA2W7wmcaqjfKc-qND5aoW11l-rf-Vrp3zsi-lzhXydRB0b5-C6ZtUMx8gQJd7QcvcSH2OPAf2SVYCIUScgBNc63yB9pCNd9VTtmf4Yd4JC88/s1600/multifox-+2+account+in+same+browser-installing.png

      3.After Installing you will be asked to Restart your Firefox. Just save your work and Restart.

      4. After restarting your browser you can right click on Tab menu and then select Open in a new Identity profile

      5. It will open a new Firefox Window where you can log in to your second account freely without Log out from 1st one. Hope this trick help you.

      How to access www.google.com

      Some times we want to access google.com instead of country related versions. The search results in each google.xx is may varied a lot. whenever you tired to access Google from your browser by typing google.com it shows an Indian version of google (www.google.co.in).

      This problem has a solution in google.co.in itself. When you reach the google home page, you'll see a page like this:


      At the half right-bottom of this page, you'll see a link saying goto google.com

      Click on the link and you'll be automatically redirected to google.com. You can return to google.co.in by clicking Go to Google India.


      Appear Online To Only Few Selected Friends In Facebook Chat

       
      We all will have a lot of annoying people in our facebook chat often. We want to be online and still unable to help ourselves to put this people out of our chat. Do you know that in your facebook account there are few options which can make your things go easy? If not, then you are at the right place..  Well this is really possible. You can appear offline to selected friends on your Facebook chat. Facebook is really flexible if you know how to use it properly. Today let me tell you about a awesome feature in facebook, which most of the people don’t know how to use it and face a lot of problems with unknown people.

      Just follow the simple steps given below.

      Step 1 : After you login your facebook account, Just go to Account -> Edit Friends . Now you can see a option called as Create List .

      Step 2 : Now click on create a list to make your own list. And give any name and start adding your friends in it.

      Step 3 : After creating list, Now you can see all your created lists in the Account Page -> Edit Friends . You can create as many as you can and save them.

      Step 4 : Now go to the facebook chat , where you can see all the lists which your have created already. After going to your chat, Just check that there is a green capsule beside each and every list which you have created. That green capsule will allow you to enable and disable the chat when ever required and keep you away from people whom you don’t wont to appear online to.

      Finally Gmail have its new look


      After many days of previewing Gmail’s new look, finally it has been launched. Its very fast loading and have better fit to any screen. Not only look has been changed for Gmail but some features have been also updated for all users of Google mail.


      Here is the list of new features added with new look:

      (1) New languages for Gmail on iPhone and Android
      (2) Get through your email faster with Simpler Priority Inbox
      (3) A new better look for Gmail and new updates to Contacts
      (4) One Click Google Buzz in Gmail
      (5) Enhanced security of you mails as Gmail now even more secure: HTTPS by default
      (6) Storage limit has been extended to store more and more emails with attachments.
      (7) Unique and Improved Themes
      (8) Direct Translation of your mails of unknown languages.
      (9) And many more…

      Saturday, October 6, 2012

      Enable or disable macros in Office documents

      This article is about macro security and explains the risks of enabling macros and how the Trust Center in the 2007 Microsoft Office system can help to mitigate these risks.

      What is a macro and what is the security risk?

      Macros automate frequently-used tasks; many are created with VBA (Visual Basic for Applications (VBA): A macro-language version of Microsoft Visual Basic that is used to program Microsoft Windows-based applications and is included with several Microsoft programs.) and are written by software developers. However, some macros pose a potential security risk. A person with malicious intent can introduce a destructive macro, in a document or file, which can spread a virus (virus: A computer program or macro that "infects" computer files by inserting copies of itself into those files. When the infected file is loaded into memory, the virus can infect other files. Viruses often have harmful side effects.) on your computer.
       

      Enable or disable macros with the Trust Center

      Macro security settings are located in the Trust Center. However, if you work in an organization, your system administrator might have changed the default settings to prevent anyone from changing any settings.

      Note   When you change your macro settings in the Trust Center, they are changed only for the Office program that you are currently using. The macro settings are not changed for all your Office programs.

      Which program are you using?

      Access

      1. Click the Microsoft Office Button Button image, and then click Access Options.
      2. Click Trust Center, click Trust Center Settings, and then click Macro Settings.
      3. Click the options that you want:
        • Disable all macros without notification Click this option if you don't trust macros. All macros in documents and security alerts about macros are disabled. If there are documents with unsigned macros that you do trust, you can put those documents into a trusted location. Documents in trusted locations are allowed to run without being checked by the Trust Center security system.
        • Disable all macros with notification This is the default setting. Click this option if you want macros to be disabled, but you want to get security alerts if there are macros present. This way, you can choose when to enable those macros on a case by case basis.
        • Disable all macros except digitally signed macros This setting is the same as the Disable all macros with notification option, except that if the macro is digitally signed by a trusted publisher, the macro can run if you have already trusted the publisher. If you have not trusted the publisher, you are notified. That way, you can choose to enable those signed macros or trust the publisher. All unsigned macros are disabled without notification.
        • Enable all macros (not recommended, potentially dangerous code can run) Click this option to allow all macros to run. This setting makes your computer vulnerable to potentially malicious code and is not recommended.

      Excel

      1. Click the Microsoft Office Button Button image, and then click Excel Options.
      2. Click Trust Center, click Trust Center Settings, and then click Macro Settings.
      3. Click the options that you want:
        • Disable all macros without notification Click this option if you don't trust macros. All macros in documents and security alerts about macros are disabled. If there are documents with unsigned macros that you do trust, you can put those documents into a trusted location. Documents in trusted locations are allowed to run without being checked by the Trust Center security system.
        • Disable all macros with notification This is the default setting. Click this option if you want macros to be disabled, but you want to get security alerts if there are macros present. This way, you can choose when to enable those macros on a case by case basis.
        • Disable all macros except digitally signed macros This setting is the same as the Disable all macros with notification option, except that if the macro is digitally signed by a trusted publisher, the macro can run if you have already trusted the publisher. If you have not trusted the publisher, you are notified. That way, you can choose to enable those signed macros or trust the publisher. All unsigned macros are disabled without notification.
        • Enable all macros (not recommended, potentially dangerous code can run) Click this option to allow all macros to run. This setting makes your computer vulnerable to potentially malicious code and is not recommended.
        • Trust access to the VBA project object model    This setting is for developers and is used to deliberately lock out or allow programmatic access to the VBA object model from any Automation client. In other words, it provides a security option for code that is written to automate an Office program and programmatically manipulate the Microsoft Visual Basic for Applications (VBA) environment and object model. This is a per user and per application setting, and denies access by default. This security option makes it more difficult for unauthorized programs to build "self-replicating" code that can harm end-user systems. For any Automation client to be able to access the VBA object model programmatically, the user running the code must explicitly grant access. To turn on access, select the check box.
       Tip   You can open the macro security settings dialog box from the Developer tab in the Ribbon, which is part of the Microsoft Office Fluent user interface. If the Developer tab is not available, click the Microsoft Office ButtonButton image, and then click Excel Options. Click Popular, and then select the Show Developer tab in the Ribbon check box.

      Outlook

      1. On the Tools menu, click Trust Center.
      2. Click Macro Settings.
      3. Click the options that you want:
        • No warnings and disable all macros Click this option if you don't trust macros. All macros and security alerts about macros are disabled.
        • Warnings for signed macros; all unsigned macros are disabled This is the default setting and is the same as the Disable all macros with notification option, except that if the macro is digitally signed by a trusted publisher, the macro can run if you have already trusted the publisher. If you have not trusted the publisher, you are notified. That way, you can choose to enable those signed macros or trust the publisher. All unsigned macros are disabled without notification.
        • Warnings for all macros Click this option if you want macros to be disabled, but you want to get security alerts if there are macros present. This way, you can choose when to enable those macros on a case by case basis.
        • No security check for macros (Not recommended) Click this option to allow all macros to run. This setting makes your computer vulnerable to potentially malicious code and is not recommended.

      PowerPoint

      1. Click the Microsoft Office Button Button image, and then click PowerPoint Options.
      2. Click Trust Center, click Trust Center Settings, and then click Macro Settings.
      3. Click the options that you want:
        • Disable all macros without notification Click this option if you don't trust macros. All macros in documents and security alerts about macros are disabled. If there are documents with unsigned macros that you do trust, you can put those documents into a trusted location. Documents in trusted locations are allowed to run without being checked by the Trust Center security system.
        • Disable all macros with notification This is the default setting. Click this option if you want macros to be disabled, but you want to get security alerts if there are macros present. This way, you can choose when to enable those macros on a case by case basis.
        • Disable all macros except digitally signed macros This setting is the same as the Disable all macros with notification option, except that if the macro is digitally signed by a trusted publisher, the macro can run if you have already trusted the publisher. If you have not trusted the publisher, you are notified. That way, you can choose to enable those signed macros or trust the publisher. All unsigned macros are disabled without notification.
        • Enable all macros (not recommended, potentially dangerous code can run) Click this option to allow all macros to run. This setting makes your computer vulnerable to potentially malicious code and is not recommended.
        • Trust access to the VBA project object model    This setting is for developers and is used to deliberately lock out or allow programmatic access to the VBA object model from any Automation client. In other words, it provides a security option for code that is written to automate an Office program and programmatically manipulate the Microsoft Visual Basic for Applications (VBA) environment and object model. This is a per user and per application setting, and denies access by default. This security option makes it more difficult for unauthorized programs to build "self-replicating" code that can harm end-user systems. For any Automation client to be able to access the VBA object model programmatically, the user running the code must explicitly grant access. To turn on access, select the check box.
       Tip   You can open the macro security settings dialog box from the Developer tab in the Ribbon, which is part of the Microsoft Office Fluent user interface. If the Developer tab is not available, click the Microsoft Office ButtonButton image, and then click PowerPoint Options. Click Popular, and then select the Show Developer tab in the Ribbon check box.

      Publisher

      1. On the Tools menu, click Trust Center.
      2. Click Macro Settings.
      3. Click the options that you want:
        • Disable all macros without notification Click this option if you don't trust macros. All macros in documents and security alerts about macros are disabled. If there are documents with unsigned macros that you do trust, you can put those documents into a trusted location. Documents in trusted locations are allowed to run without being checked by the Trust Center security system.
        • Disable all macros with notification This is the default setting. Click this option if you want macros to be disabled, but you want to get security alerts if there are macros present. This way, you can choose when to enable those macros on a case by case basis.
        • Disable all macros except digitally signed macros This setting is the same as the Disable all macros with notification option, except that if the macro is digitally signed by a trusted publisher, the macro can run if you have already trusted the publisher. If you have not trusted the publisher, you are notified. That way, you can choose to enable those signed macros or trust the publisher. All unsigned macros are disabled without notification.
        • Enable all macros (not recommended, potentially dangerous code can run) Click this option to allow all macros to run. This setting makes your computer vulnerable to potentially malicious code and is not recommended.
        • Trust access to the VBA project object model    This setting is for developers and is used to deliberately lock out or allow programmatic access to the VBA object model from any Automation client. In other words, it provides a security option for code that is written to automate an Office program and programmatically manipulate the Microsoft Visual Basic for Applications (VBA) environment and object model. This is a per user and per application setting, and denies access by default. This security option makes it more difficult for unauthorized programs to build "self-replicating" code that can harm end-user systems. For any Automation client to be able to access the VBA object model programmatically, the user running the code must explicitly grant access. To turn on access, select the check box.

      Visio

      1. On the Tools menu, click Trust Center.
      2. Click Macro Settings.
      3. Click the options that you want:
        • Disable all macros without notification Click this option if you don't trust macros. All macros in documents and security alerts about macros are disabled. If there are documents with unsigned macros that you do trust, you can put those documents into a trusted location. Documents in trusted locations are allowed to run without being checked by the Trust Center security system.
        • Disable all macros with notification This is the default setting. Click this option if you want macros to be disabled, but you want to get security alerts if there are macros present. This way, you can choose when to enable those macros on a case by case basis.
        • Disable all macros except digitally signed macros This setting is the same as the Disable all macros with notification option, except that if the macro is digitally signed by a trusted publisher, the macro can run if you have already trusted the publisher. If you have not trusted the publisher, you are notified. That way, you can choose to enable those signed macros or trust the publisher. All unsigned macros are disabled without notification.
        • Enable all macros (not recommended, potentially dangerous code can run) Click this option to allow all macros to run. This setting makes your computer vulnerable to potentially malicious code and is not recommended.
        • Trust access to the VBA project object model    This setting is for developers and is used to deliberately lock out or allow programmatic access to the VBA object model from any Automation client. In other words, it provides a security option for code that is written to automate an Office program and programmatically manipulate the Microsoft Visual Basic for Applications (VBA) environment and object model. This is a per user and per application setting, and denies access by default. This security option makes it more difficult for unauthorized programs to build "self-replicating" code that can harm end-user systems. For any Automation client to be able to access the VBA object model programmatically, the user running the code must explicitly grant access. To turn on access, select the check box.

      Word

      1. Click the Microsoft Office Button Button image, and then click Word Options.
      2. Click Trust Center, click Trust Center Settings, and then click Macro Settings.
      3. Click the options that you want:
        • Disable all macros without notification Click this option if you don't trust macros. All macros in documents and security alerts about macros are disabled. If there are documents with unsigned macros that you do trust, you can put those documents into a trusted location. Documents in trusted locations are allowed to run without being checked by the Trust Center security system.
        • Disable all macros with notification This is the default setting. Click this option if you want macros to be disabled, but you want to get security alerts if there are macros present. This way, you can choose when to enable those macros on a case by case basis.
        • Disable all macros except digitally signed macros This setting is the same as the Disable all macros with notification option, except that if the macro is digitally signed by a trusted publisher, the macro can run if you have already trusted the publisher. If you have not trusted the publisher, you are notified. That way, you can choose to enable those signed macros or trust the publisher. All unsigned macros are disabled without notification.
        • Enable all macros (not recommended, potentially dangerous code can run) Click this option to allow all macros to run. This setting makes your computer vulnerable to potentially malicious code and is not recommended.
        • Trust access to the VBA project object model    This setting is for developers and is used to deliberately lock out or allow programmatic access to the VBA object model from any Automation client. In other words, it provides a security option for code that is written to automate an Office program and programmatically manipulate the Microsoft Visual Basic for Applications (VBA) environment and object model. This is a per user and per application setting, and denies access by default. This security option makes it more difficult for unauthorized programs to build "self-replicating" code that can harm end-user systems. For any Automation client to be able to access the VBA object model programmatically, the user running the code must explicitly grant access. To turn on access, select the check box.
       Tip   You can open the macro security settings dialog box from the Developer tab in the Ribbon, which is part of the Microsoft Office Fluent user interface. If the Developer tab is not available, click the Microsoft Office ButtonButton image, and then click Word Options. Click Popular, and then select the Show Developer tab in the Ribbon check box.

      How can the Trust Center help protect me from unsafe macros?

      Before enabling a macro in a document, the Trust Center checks for the following information:
      • The macro is signed by the developer with a digital signature (digital signature: An electronic, encryption-based, secure stamp of authentication on a macro or document. This signature confirms that the macro or document originated from the signer and has not been altered.).
      • The digital signature is valid (valid: Refers to the status of a certificate checked against a certificate authority's database and found to be legitimate, current, and not expired or revoked. Documents signed by a valid certificate and not altered since signing are considered valid.).
      • This digital signature is current (not expired).
      • The certificate associated with the digital signature was issued by a reputable certificate authority (CA) (certificate authority (CA): A commercial organization that issues digital certificates, keeps track of who is assigned to a certificate, signs certificates to verify their validity, and tracks which certificates are revoked or expired.).
      • The developer who signed the macro is a trusted publisher (trusted publisher: The developer of a macro that is trusted by you on your computer. The trusted publisher is identified by the certificate that they used to digitally sign the macro. Also known as a trusted source.).
      If the Trust Center detects a problem with any of these, the macro is disabled by default, and the Message Bar appears to notify you of a potentially unsafe macro.

      Document Action Bar
      To enable the macro click Options on the Message Bar, a security dialog box opens. See the next section for information about making decisions about macros and security.
       Note   In Microsoft Office Outlook 2007 and Microsoft Office Publisher 2007, security alerts appear in dialog boxes, not in the Message Bar.

      A security warning asks if I want to enable or disable a macro. What should I do?

      When the Securty Options dialog appears, you can enable the macro or leave it disabled. You should enable the macro if you are sure it is from a trustworthy source.

      Microsoft Office Security Options

       Important   If you are sure the document and macro are from a trustworthy source and have a valid signature, and you do not want to be notified about them again, instead of changing the default Trust Center settings to a less safe macro security setting, you can click Trust all documents from this publisher in the security dialog box. This adds the publisher to your Trusted Publishers list in the Trust Center. All software from that publisher is trusted. In the case where the macro doesn't have a valid signature, but you trust it and don't want to be notified again, instead of changing the default Trust Center settings to a less safe macro security setting, it is better to move the document to a trusted location. Documents in trusted locations are allowed to run without being checked by the Trust Center security system.
      Depending on the situation, the security dialog box describes the specific problem. The following table lists the possible problems and offers advice on what you should or should not do in each case.

      How to disable and re-enable hibernation on a computer that is running Windows 7

      To make hibernation unavailable, follow these steps:
      1. Click Start, and then type cmd in the Start Search box.
      2. In the search results list, right-click Command Prompt, and then click Run as Administrator.
      3. When you are prompted by User Account Control, click Continue.
      4. At the command prompt, type powercfg.exe /hibernate off, and then press ENTER.
      5. Type exit and then press ENTER to close the Command Prompt window.
      To make hibernation available, follow these steps:
      1. Click Start, and then type cmd in the Start Search box.
      2. In the search results list, right-click Command Prompt, and then click Run as Administrator.
      3. When you are prompted by User Account Control, click Continue.
      4. At the command prompt, type powercfg.exe /hibernate on, and then press ENTER.
      5. Type exit and then press ENTER to close the Command Prompt window. 

      Friday, October 5, 2012

      Installing IIS 7 on Windows Server 2008 or Windows Server 2008 R2

      Introduction

      You can use Microsoft® Web Platform Installer (Web PI) to easily install Internet Information Services (IIS) and applications that run on IIS. However, if you choose to install IIS manually, you can use this article for guidance. You can also refer to Installing and Configuring IIS 7 and Above.
      IIS 7.0 is the Web server role in Windows Server® 2008 and the Web server in Windows Vista®. IIS 7.5 is the Web server role in Windows Server® 2008 R2 and the Web server in Windows® 7. Windows Server 2008 R2 and Windows Server 2008 operating systems have all the IIS features needed to support the hosting of Web content in production environments. Windows 7 and Windows Vista also include IIS features, but the available features depend on the operating system versions.
      The Web server was redesigned in IIS 7.0 to enable you to customize a server by adding or removing modules to meet your specific needs. Modules are individual features that the server uses to process requests. For example, IIS 7.0 and IIS 7.5 use authentication modules to authenticate client credentials and use cache modules to manage cache activity. Both versions of IIS also provide:
      • A new management interface. The interface lets you quickly and easily change the settings for each Web site. It is also possible to edit the settings of a Web site in a text-based configuration file.
      • The ability to share tasks with Web site owners. A hoster with multiple sites can delegate administrative control to developers or content owners.

      New in IIS 7.5

      IIS 7.0 and IIS 7.5 are together known as IIS 7 or IIS 7 and above; however, IIS 7.5 and Windows Server 2008 R2 include several new features not found in IIS 7.0:
      • Microsoft® ASP.NET runs on Windows Server 2008 R2 Server Core installations.
      • Some of the extensions available to be added to the IIS 7.0 platform are integrated into the IIS 7.5 platform, including:
        • FTP publishing.
        • Web-based Distributed Authoring and Versioning (WebDAV) publishing.
        • Windows PowerShell™ snap-in for IIS.
        • IIS Administration Pack modules.
      • IIS 7.5 includes configuration logging and tracing (IIS 7.0 does not include any built-in tracing mechanisms for configuration changes).
      • IIS 7.5 includes the Best Practice Analyzer, an automated tool for helping to ensure compliance with security best practices.

      Before You Begin

      Ensure that you have administrative user rights on the computer on which you plan to install IIS 7 or above. Note that by default, you do not have administrative user rights if you are logged on as a user other than as the built-in administrator, even if you were added to the local Administrators group on the computer (this is a new security feature in Windows Server 2008 called Local User Administrator).
      Log on either to the built-in administrator account, or explicitly invoke applications as the built-in administrator by using the runas command-line tool.
      Note: You can run runas /user:administrator cmd.exe so that every application you run from that command line will be elevated, eliminating the need to use the runas syntax from that command line.
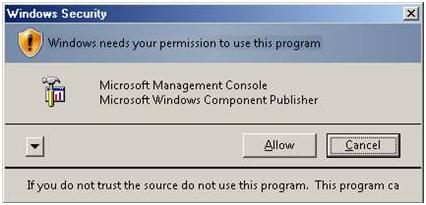
      If you are logged on to an account other than the built-in local administrator account, you may see the following security alert dialog box.
      Figure 1: Windows® Security (User Account Control)

      Install IIS 7.5 on Windows Server 2008 R2

      IIS is one of the Windows Server® server roles. IIS can be installed through the graphical user interface (GUI) by using the new Server Manager interface after the Windows Server operating system is installed.
      Server Manager provides a single dashboard to install or uninstall server roles and features. Server Manager also gives an overview of all currently installed roles and features. When IIS is chosen from the Server Manager, the basic components and services needed for IIS are automatically selected.
      1. Click Start -> All Programs -> Administrative Tools -> Server Manager.
      Figure 2: Server Manager
      2. In the Server Manager window, scroll down to Roles Summary, and then click Add Roles. The Add Roles Wizard will start with a Before You Begin page. The wizard asks for verification of the following:
      a. The administrator account has a strong password.
      b. The network settings, such as IP addresses, are configured.
      c. The latest security updates from Windows® Update are installed.
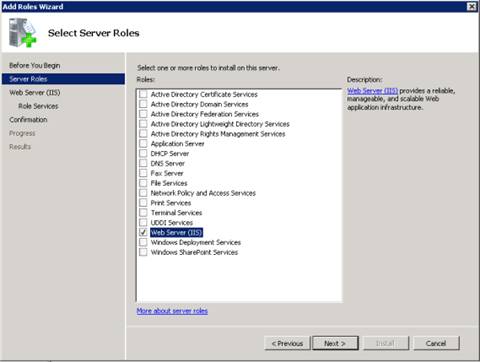
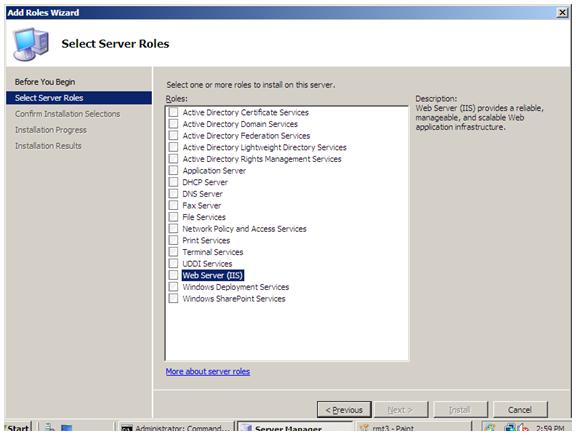
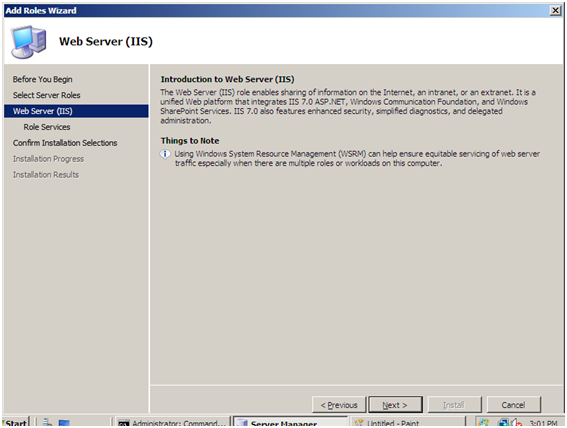
      3. Select Web Server (IIS) on the Select Server Roles page. An introductory page will open with links for further information.
      Note: When you use the Add Roles Wizard to install IIS, you get the default installation, which has a minimum set of role services. If you need additional IIS role services, such as Application Development or Health and Diagnostics, make sure to select the check boxes associated with those features in the Select Role Services page of the wizard.
      Figure 3: Select Server Roles
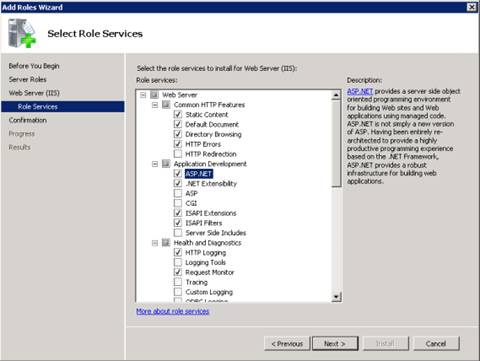
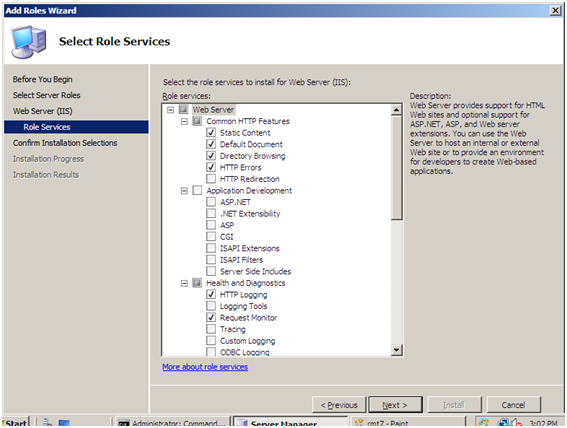
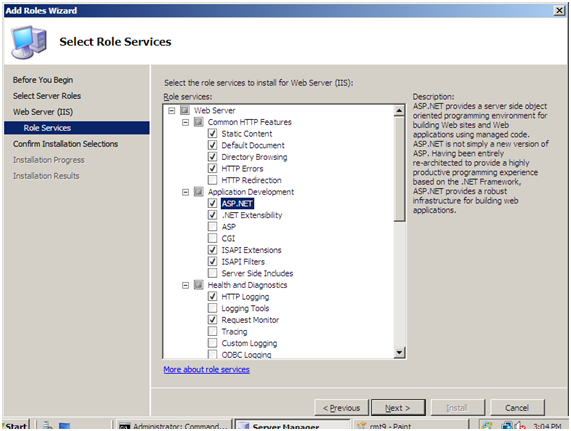
      4. Select the IIS services to be installed on the Select Role Services page. Add only the modules necessary. In this case, ASP.NET is selected, and a description of ASP.NET appears in the right pane. Once desired modules are added, click Next.
      Figure 4: Select Role Services
      5. Add any required role services.
      Figure 5: Wizard warning page
      6. IIS is now installed with a default configuration for hosting ASP.NET on Windows Server. Click Close to complete the process.
      Figure 6: Installation Results page
      7. Confirm that the Web server works by using http://localhost.
      Figure 7: Default Web site
      Note: Install only the absolutely necessary IIS services to minimize the IIS installation footprint. This also minimizes the attack surface, which is one of the benefits of IIS 7 and above.

      Use a Script to Install IIS 7.5 on Windows Server 2008 R2

      You can also use a script to install IIS 7.5. Note that if you use this script, you get the full IIS installation, which installs all available feature packages. If there are feature packages you do not need, you should edit the script to install only the packages you require. For more information, see Installing IIS 7.5 on Windows Server 2008 R2.
      To install IIS 7.5 with a script, type the following at a command prompt:
      CMD /C START /w PKGMGR.EXE /l:log.etw /iu:IIS-WebServerRole;IIS-WebServer;IIS-CommonHttpFeatures;IIS-StaticContent;IIS-DefaultDocument;IIS-DirectoryBrowsing;IIS-HttpErrors;IIS-HttpRedirect;IIS-ApplicationDevelopment;IIS-ASP;IIS-CGI;IIS-ISAPIExtensions;IIS-ISAPIFilter;IIS-ServerSideIncludes;IIS-HealthAndDiagnostics;IIS-HttpLogging;IIS-LoggingLibraries;IIS-RequestMonitor;IIS-HttpTracing;IIS-CustomLogging;IIS-ODBCLogging;IIS-Security;IIS-BasicAuthentication;IIS-WindowsAuthentication;IIS-DigestAuthentication;IIS-ClientCertificateMappingAuthentication;IIS-IISCertificateMappingAuthentication;IIS-URLAuthorization;IIS-RequestFiltering;IIS-IPSecurity;IIS-Performance;IIS-HttpCompressionStatic;IIS-HttpCompressionDynamic;IIS-WebServerManagementTools;IIS-ManagementScriptingTools;IIS-IIS6ManagementCompatibility;IIS-Metabase;IIS-WMICompatibility;IIS-LegacyScripts;WAS-WindowsActivationService;WAS-ProcessModel;IIS-FTPServer;IIS-FTPSvc;IIS-FTPExtensibility;IIS-WebDAV;IIS-ASPNET;IIS-NetFxExtensibility;WAS-NetFxEnvironment;WAS-ConfigurationAPI;IIS-ManagementService;MicrosoftWindowsPowerShell

      Unattended Installation of IIS 7.0 on Windows Server 2008

      Automating the installation of IIS by using unattended scripts is very useful if you need to deploy multiple Web servers and want to ensure that each of the Web servers is set up with identical components and services.
      In the Windows Server 2008 and Windows Vista operating systems, Pkgmgr.exe is used for unattended scripts, letting you install or uninstall optional features from a command prompt or scripts. (Note: Pkgmgr.exe replaces Sysocmgr.exe which was used in Windows Server® 2003.) For instructions and an overview of Pkgmgr.exe, see Installing IIS 7.0 and Above from the Command Line. See also Unattended Setup to Install IIS 7.0 and Above. Note that to use Pkgmgr.exe, you must make sure you have administrative user rights on the computer.

      Install IIS 7.0 on Windows Server 2008

      1. To start Server Manager, click Start Menu -> All Programs -> Administrative Tools -> Server Manager. The Server Manager window opens.

      Figure 8: Server Manager
      2. In the Server Manager window, select Roles. The Role Summary View is displayed.

      Figure 9: Start Add Roles Wizard
      3. Click Add Roles. The Add Roles Wizard opens. Click Next to select roles to install.

      Figure 10: Add Roles Wizard Introduction
      4. Select Web Server (IIS).

      Figure 11: Select Web Server (IIS) in Add Roles Wizard
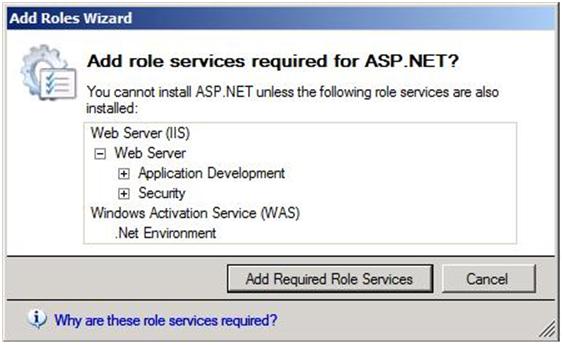
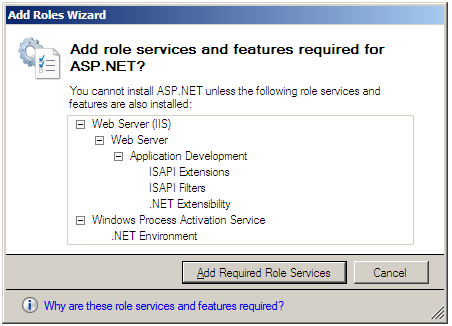
      5. The Add Roles Wizard notifies you of any required dependencies; since IIS depends on the Windows Process Activation Service (WAS) feature, the following informational dialog box appears. Click Add Required Role Services to continue.

      Figure 12: Add Dependencies
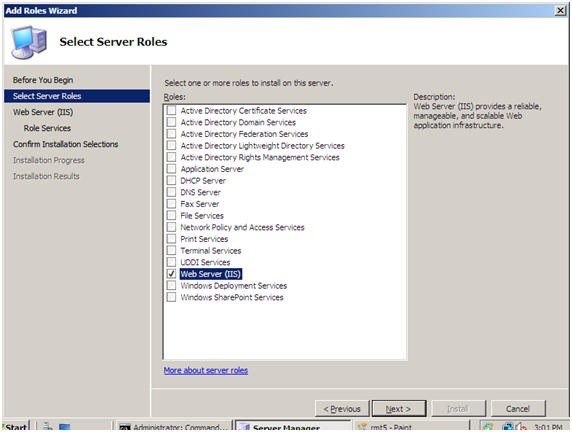
      6. The Web Server is now selected for install. The Select Server Roles dialog box opens. Click Next to continue.

      Figure 13: Selected Web Server (IIS)
      7. The following dialog box and information appears. Click Next to continue.

      Figure 14: Introduction to Web Server dialog box
      8. The Add Roles Wizard displays a list of all IIS 7.0 features available to install as shown below. Note that features comprising the default install are pre-selected.

      Figure 15: Web Server Features Listed
      9. To install just the IIS 7.0 default features, click the Install button, and then proceed to Step 14. If you need to install additional features, proceed to step 10.
      10. For this example, we install additional IIS features. Select the check box for ASP.NET. The Wizard warns if adding an IIS feature will also cause other features to be installed.

      Figure 16: Dependency Information
      11. Click Add Required Role Services to continue.
      12. Continue selecting additional IIS Role Services features to install.

      Figure 17: Add Features For Web Server
      13. When you have selected all the features you require, click Next to continue.
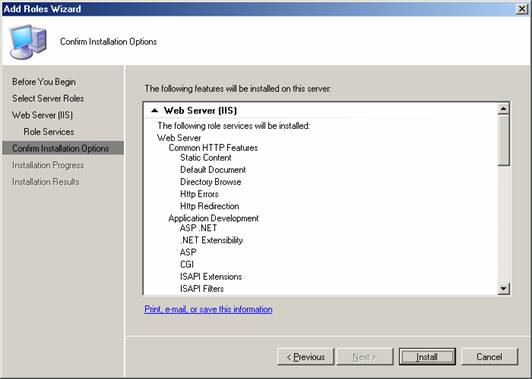
      14. The Wizard provides a summary of what will be installed.

      Figure 18: Summary of Features
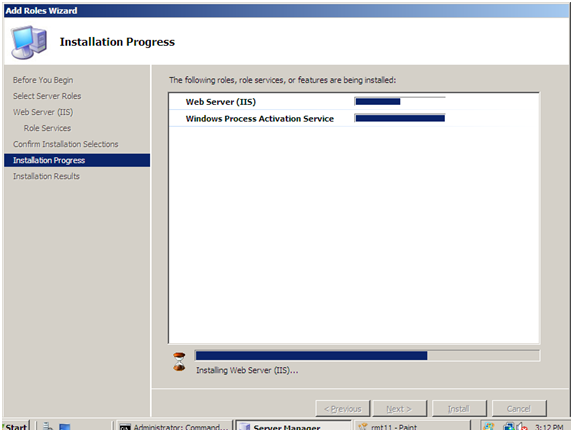
      15. Click Install to continue. The Installation Progress dialog box opens.

      Figure 19: Install Progress
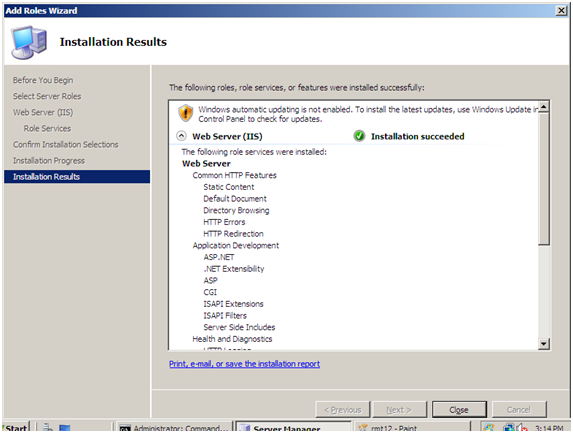
      16. When the IIS 7.0 installation is complete, the following dialog box opens. Click Close to return to the Server Manager.

      Figure 20: Installation Summary
      17. You can now perform a quick check to verify that IIS 7.0 is installed. Start the Windows® Internet Explorer® Web browser, and enter the address http://localhost. You should see the default IIS "Welcome" page.